Auto Power On and VCSA Upgrades
VMware vSphere 6.5 comes with a RESTful API implementation and there’s some great documentation out there- starting with the API Explorer (http://my.vcenter.name/apiexplorer ). Here’s a quick piece on how to use this API to create a VM from the PowerShell command line. This is intentionally not using PowerCLI, just the native PowerShell cmdlets- partly as a REST learning experience for me, and partly so the API code can be transferred to another language at a later date.
Step 1- Authenticate with the Server.
This step is well documented by Chris Wahl. I’ve borrowed some of his code here, and accompanied it with a section to get around the lack of trusted certificates on my homelab. 192.168.0.240 is the IP of my VCSA, so if you’re reusing this anywhere remember to replace that hard coded value where it appears.
 1#----------------------------------------------------------------------------------------------
 2#Step 1- Authenticate with the Server
 3#Ignore Server Certs- This is on my not-very-well-certified home lab.
 4if (-not ([System.Management.Automation.PSTypeName]'ServerCertificateValidationCallback').Type)
 5{
 6$certCallback=@"
 7using System;
 8using System.Net;
 9using System.Net.Security;
10using System.Security.Cryptography.X509Certificates;
11public class ServerCertificateValidationCallback
12{
13public static void Ignore()
14{
15if(ServicePointManager.ServerCertificateValidationCallback ==null)
16{
17ServicePointManager.ServerCertificateValidationCallback +=
18delegate
19(
20Object obj,
21X509Certificate certificate,
22X509Chain chain,
23SslPolicyErrors errors
24)
25{
26return true;
27};
28}
29}
30}
31"@
32Add-Type $certCallback
33}
34[ServerCertificateValidationCallback]::Ignore();
35
36#Get Some Credentials and Determine Authorisation Methods
37$Credential = Get-Credential
38$auth = [System.Convert]::ToBase64String([System.Text.Encoding]::UTF8.GetBytes($Credential.UserName+':'+$Credential.GetNetworkCredential().Password))
39$head = @{
40'Authorization' = "Basic $auth"
41}
42
43#Authenticate against vCenter
44$r = Invoke-WebRequest -Uri https://192.168.0.240/rest/com/vmware/cis/session -Method Post -Headers $head
45$token = (ConvertFrom-Json $r.Content).value
46$session = @{'vmware-api-session-id' = $token}
Now we have the Session ($session) we can test this by retrieving a list of VMs.
1#----------------------------------------------------------------------------------------------
2#Get a List of VMs
3$r1 = Invoke-WebRequest -Uri https://192.168.0.240/rest/vcenter/vm -Method Get -Headers $session
4$vms = (ConvertFrom-Json $r1.Content).value
5$vms
Step 2- Construct the JSON specification
To create a new VM we need to provide a minimal spec for the machine, in JSON format. We need to tell it the intended Guest OS, what datastore is going to hold the VM, and where the VM will be placed in the resource/folder structure. To complete this we need to establish what options are available- just sticking in the display names of a datastore or folder from the Web Client will not work and will likely generate 404 responses to the API call.
To find these names we can use the API, API explorer gives us the following urls
1Datastore:       /rest/vcenter/datastore
2Folder:              /rest/vcenter/folder
3Resource Pool: /rest/vcenter/resource-pool
So we can use PowerShell to retrieve a list of Datastores using this line of code
1(Invoke-RestMethod -Uri https://192.168.0.240/rest/vcenter/datastore -Method Get -Headers $session ).value
which will produce a list of datastores, each looking something like this:
1datastore  : datastore-11
2name       : Datastore2
3type       : VMFS
4free_space : 100553195520
5capacity   : 249913409536
From this example we want the value of the “datastore” field, e.g “datastore-11”.
Once we have this information we can combine it all to create a JSON spec file. My example looks like this:
 1{
 2"spec": {
 3"guest_OS": "RHEL_7_64",
 4"placement" : {
 5"datastore": "datastore-11",
 6"folder": "group-v224",
 7"resource_pool": "resgroup-182"
 8}
 9}
10}
Step 3- Create the Virtual Machine.
Now we’ve done all this prep work, creating a Virtual Machine comes down to a single line of PowerShell pointing at the data.txt file containing the JSON code from Step 2.
1Invoke-WebRequest -Uri https://192.168.0.240/rest/vcenter/vm -Method Post -Headers $session -ContentType "application/json" -Body (Get-Content data.txt)
Example Output:
 1StatusCode        : 200
 2StatusDescription : OK
 3Content           : {"value":"vm-462"}
 4RawContent        : HTTP/1.1 200 OK
 5Transfer-Encoding: chunked
 6Content-Type: application/json
 7Date: Mon, 27 Mar 2017 09:41:34 GMT
 8
 9{"value":"vm-462"}
10Forms             : {}
11Headers           : {[Transfer-Encoding, chunked], [Content-Type, application/json], [Date, Mon, 27 Mar 2017 09:41:34 GMT]}
12Images            : {}
13InputFields       : {}
14Links             : {}
15ParsedHtml        : mshtml.HTMLDocumentClass
16RawContentLength  : 18
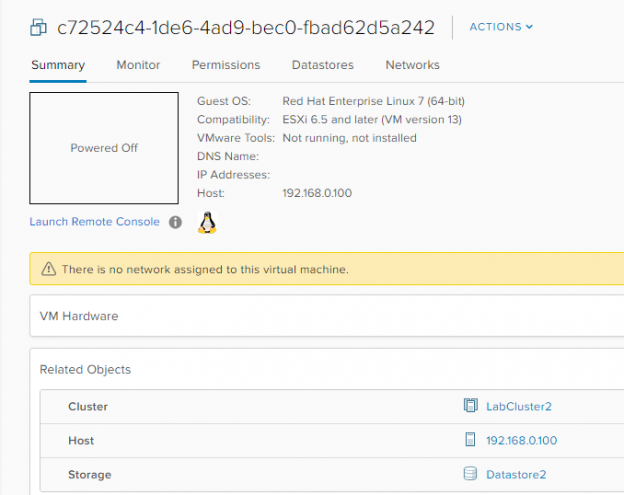
The VM is created and we can check this from the vSphere Client:
So, to summarise. Native PowerShell, with a little bit of JSON, can be used to communicate with the vSphere APIs and create new Virtual Machines. Depending on your use case there may be better ways of implementing automation processes through this API (PowerCLI is a good start) but if you want to drop to the raw RESTful API, possibly as a stepping stone to a larger project, PowerShell provides a handy method to get started down that path.